Magi Coin is a great alternative coin in the cryptocurrency world. I like it because of several reasons, but mostly because of its unique way of controlling the generation of new coins and throttling the network whenever the hashrate is too high, effectively making it suitable for small miners, like myself.
While people who have mined before are probably familiar with the term proof-of-work (PoW), Magi Coin also introduces another feature called proof-of-stake (PoS).
According to Magi Coin’s website, PoS is calculated from the coin age and stake weight. These are some extremely vague terms, which I wish there was more information about. If I find more information I’ll summarize it on a future post, but for now let’s start with what we know.
Before that, I just want to mention that while most, if not all, articles and guides I found online were focused on running the Magi Coin wallet on a Raspberry Pi (including this one, which this post is heavily based on), I aim to provide instructions to building and running the wallet on any Linux Debian-based maching using nothing but the terminal.
Building the wallet
1. Installing dependencies
$ sudo apt install build-essential git libgmp-dev libboost-all-dev libdb-dev libdb5.3++-dev libminiupnpc-dev
- build-essential →
dpkg-devg++gcclibc-devandmake. - git → For cloning the source code depository.
- libgmp-dev → Collection of arithmetic functions used in cryptography.
- libboost-all-dev → This one should take some good chunk of space. I did try to install only
libboost-devbut couldn’t compile with it. - libdb-dev and libdb5.3++-dev → Berkeley Database Libraries for C and C++ respectively.
Update: It was brought to my attention that the wallet prefers version 4.8.30 of these packages, for compatibility purposes. In my testing it works just fine with version 5.3.0, but those who want to compile everything from source, including dependencies, can go to this page. - libminiupnpc-dev → According to this page it’s used for optional firewall-jumping support.
Note: This command WILL install extra dependencies not listed here, if not already installed. This is normal.
2. Making sure we have the right libssl-dev version
Now this part is a little tricky. The wallet doesn’t seem to compile with libssl-dev newer versions of the package (1.1 and up), so we’ll have to make sure we got an earlier one.
In order to do that, we need to find out what versions are available at the repository:
$ sudo apt-cache policy libssl-dev
Output of this command will vary from system to system. Mine looks like that:
libssl-dev:
  Installed: 1.0.1t-1+deb8u7
  Candidate: 1.1.0f-3+deb9u1
  Version table:
     1.1.0f-3+deb9u1 500
        500 http://ftp.debian.org/debian stretch/main arm64 Packages
        500 http://security.debian.org stretch/updates/main arm64 Packages
 *** 1.0.1t-1+deb8u7 100
        100 /var/lib/dpkg/status
Mind the “Installed” and the “***” which indicate the currently installed version.
In order to install a specific version, the apt installation command will have to specify it:
$ sudo apt install libssl-dev=1.0.1t-1+deb8u7
Note: Mind that the version includes all the extra values, but not the “0” on the same line.
In case version 1.0.1 doesn’t show up, we’ll have to add the relevant source to our sources list:
$ sudo echo "deb http://ftp.debian.org/debian/ jessie main contrib non-free" >> /etc/apt/sources.list
and then update the sources list with sudo apt update.
Optional: Keep libssl-dev from updating
Since the wallet should be recompiled again whenever a new update comes out, it might be a good idea to hold onto this version of libssl-dev by telling the system not to update it to the latest version:
$ sudo apt-mark hold libssl-dev
Also, people who like keeping their sources.list clean can remove this source after installing the package:
$ sudo sed -i '$d' /etc/apt/sources.list
Note: This command simply removes the last line we appended to sources.list earlier.
3. Getting the Magi Wallet source code from Github repository
$ git clone https://github.com/magi-project/magi.git
Note: It should be a good idea to cd first to a different folder other than ~/.
When it finishes downloading, cd into the source code folder:
$ cd magi/src
4. Compile it!
In order to compile correctly, the CPU architecture needs to be determined.
If it’s an Intel/AMD-based CPU, then the following make command will do:
$ make -f makefile.unix
In case it’s an ARM CPU, we’ll have to find its instruction set.
Taking a peek inside the source code, it appears to support armv6l as well as armv7l. This basically covers 99% of ARM mobile CPUs on the market. armv8 of newer devices should be good to go with armv7l.
To specify the architecture we’ll add the xCPUARCH=ARCH instruction at the end of the last command.
Ex: (for armv7l)
$ make -f makefile.unix xCPUARCH=armv7l
Note: In order to speed up the process, it’s possible to run it in parallel on multi-core systems. It can be achieved by adding -j CORES before -f. However, it’s not recommended to run with more than 3 cores at the same time, as it can chock any system with less than 4GB of memory. I usually use -j 2.
As the process finishes, a magid file can be found on the same folder we’re in (can be confirmed with ls | grep magid).
5. Optional: Damage control
Nothing in the world can guarantee a successful result on the first try.
Start from scratch
In case of a failure of some sort, it may be a good idea to start over from scratch by first cleaning our source folder from all the files generated on the failed attempt:
$ git clean -xdf
Check dependencies
The next logical step would be checking the installed dependencies from steps 1 and 2, and making sure the right CPU architecture was specified on step 4.
Do we have enough memory?
Finally, a compile process can fail due to lack of system memory (especially on the popular SBCs that usually come with up to 1GB of RAM). Increasing the swap file size may help overcome this issue.
Many SBC OSs allow for easy swapfile size adjustments via a file located at /etc/dphys-swapfile. After edited, there are two commands needed for setting up the new value:
$ sudo dphys-swapfile setup
$ sudo dphys-swapfile swapon
6. Optional: Making it available system-wide
The wallet can now be executed from its location inside the source code folder. For convenience, it’s possible to make it available system-wide:
$ sudo cp magid /usr/local/bin
Importing an old wallet
Those who already own a wallet and reading this post are probably using the GUI wallet. While it has a built-in backup feature, I found the console command to be the most reliable, as the file exported by the built-in feature doesn’t contain the right suffix.
$ magid backupwallet DESTINATION
This command will output a wallet.dat file which is basically a Berkeley DB file containing all the information about the wallet.
There’s actually another way to get this file, by simply navigating to the wallet’s data folder (~/.magi) and grabbing wallet.dat manually.
Be careful! Anyone who has access to wallet.dat will have access to the wallet, including making transactions.
Using the wallet
It’s important to understand that the wallet is designed to run continuously as a daemon service.
There are basically two sets of command options that magid will accept.
The first set of options is used to configure the daemon itself before running. Its list can be achieved by running:
$ magid --help
Creating the config file
Now, while it’s possible to run the wallet by specifying each and every option every time, the most reasonable and recommended way is creating a config file, which includes all the options we want to use.
I will not go over all the options, but instead will provide the config that does the following:
- Enable running as a daemon.
- Enable all the options for solo mining.
- Enable stacking using PoS (mentioned in the introduction).
daemon=1
rpcuser=USER
rpcpassword=PASS
rpcport=PORT
server=1
listen=1
rpcallowip=127.0.0.1
rpcallowip=192.168.1.*
posii=1
Note: After tirelessly trying to debug problems I faced with solo mining and stacking, I consulted with the Magi Coin Telegram Channel and found out that mysteriously, the order of options inside the config file has a meaning. Please keep that in mind when editing.
daemon=1→ Enable the wallet to run as a daemon.rpcuser=USER,rpcpassword=PASSandrpcport=PORT→USER,PASSandPORTwill be the user name, password and TCP port used for solo mining. For port, it’s advisable to use anything above 8000. (Ex: 8384)server=1andlisten=1→ Enable the server and listen to incoming connections (used for solo mining).rpcallowip→ As a security measure, incoming miner connections must be specifically allowed.127.0.0.1indicates the same machine the wallet runs on, which makes it possible to mine from the machine the wallet is installed on. As an addition, to allow all connections from the same subnet the wallet is on, it’s possible to use a wildcard (*). While my subnet is192.168.1.x, any subnet is different and should be changed accordingly. Alternatively, it’s possible to just specify a single IP address. (Ex:192.168.1.10)posii=1→ Enable stacking.
Ideally, this config file should be named magi.conf and put inside the wallet’s data folder (~/.magi). Otherwise, the path to it should be provided when running:
$ magid -conf=PATH-TO-CONFIG
Optional: Downloading the blockchain database
Blockchain technology works in a fashion that requires it to keep a record of all transactions that ever took place on the network. This results in a very big database file. For reference, at the time of writing this post, Magi blocks database and its index files weigh 1.7GB.
Downloading such a big file from a blockchain network can take up to a few days, so in order to speed up the process and relieve some stress from the network, Magi maintainers allow downloading a snapshot of the blockchain taken at a certain time, here.
While this snapshot can be a little bit old, it can save some time on the initial blockchain sync.
As we cd into our ~/.magi (data folder):
$ wget http://coinmagi.org/bin/block-chain/m-block-chain.tar.gz
$ tar xvf m-block-chain.tar.gz
$ mv m-block-chain/* .
$ rm -r m-block-chain.tar.gz m-block-chain
Note: ~/.magi folder may not exist for first-timers, and can be created by running mkdir ~/.magi.
wget…→ Downloading the database file. (Can take some time!)tar… → Extracting the content of the file.mv… → Since the files are stored inside a folder calledm-block-chain, it’s required to move them to their proper location inside.magi. (.indicated the current folder)rm… → Removing the empty folder and the.tar.gzfrom which we extracted the database.
Usage in daemon mode
When the config file is set in place with daemon=1 enabled, it’s possible to run the wallet by simply typing:
$ magid
Note: Given it’s properly installed inside /usr/local/bin.
On the initial run, the wallet will attempt to synchronize the missing blockchain data with the rest of the network, a process that should take up to a couple of hours.
At the first couple of minutes, the daemon will not accept any commands.
After that, it’d be possible to make use of the second set of options mentioned earlier. To list them all:
$ magid help
In order to confirm the synchronization progress, we need to figure out which block we’re currently on:
$ magid getblockcount
The output number can be compared to the current block count (=height) on cryptoID’s Blockchain Explorer to get an estimation on how many blocks are left to synchronize.
Other useful commands are:
magid getinfo→ Returns almost all the information one need at a glance.magid listtransactions→ Returns the last 5 transactions for all accounts**.magid checkwallet→ Will check that the imported wallet is valid.
Note: All command outputs are JSON formatted.
** It’s important to understand that a wallet can contain multiple accounts, that each can contain virtually limitless number of addresses. Default account name is empty and will show as "".
Here are some commands that can help us understand this better:
magid listaccounts→ Listing all accounts associated with the wallet.magid getaddresses→ Listing all addresses by association with an account.magid setaccount ADDRESS LABEL→ Setting a new label to an account (cannot be set for the main account with the empty label).
Stacking coins up!
As I mentioned in the introduction, Magi Coin’s PoS mechanism is full of mystery and unknown factors, but here’s what I could gather about minting (the process of stacking up coins):
- Stacking is determined by “weight” of coins, which is proportional to the “weight” of the network (network’s “weight” is always the highest possible).
- Only coins with between 520 and around 5000 confirmations are eligible for stacking.
- In addition to the above, only coins with less than one week of lifetime are eligible for stacking.
- The wallet must be online and set to minting mode for coins to stack.
Note: I could be wrong about any of those statements, so i’ll be more than happy if I’m corrected in the comments down below.
To achieve the last part, the following procedure should be taken:
- Set the wallet to minting mode by enabling
posii=1in the config file / when runningmagid. - Encrypt the wallet:
magid walletpassphrasechange OLDPASS NEWPASS(OLDPASSshould be empty if wallet is not encrypted). - Enable minting:
magid walletpassphrase PASS TIMEOUT truePASSis theNEWPASSfrom step 2.TIMEOUTfor security reasons, the wallet will lock itself up after a certain period. Those who aren’t concerned about that can specify a high number such as 9999999.truewill decrypt the wallet for minting only, whilefalsewill allow all operations. (Not sure what other operations require decrypting the wallet, but oh well…)
Be Careful! The password will be sent and logged unencrypted in the terminal, so it’d be wise to use a unique password not used anywhere else, and also secure the terminal as tight as possible.
The painful part is that minting cannot be automated, and must be manually executed when restarting the daemon.
In order to confirm the status of minting, the following command may come in handy:
$ magid getmininginfo
The interesting parts are:
"netstakeweight"→ Indicates network weight."stakeweight": "combined"→ Indicated self weight."Expected PoS"→ Will show in days or hours."stakeinterest"→ Indicates how much interest is to be collected.
Optional: Setting up a service
In order to start up the wallet daemon with the system, and automatically restart it if it crashes, the wallet needs to be configured to run as a service.
While some guides out there encourage users to use the init.d option, this option is extremely old. The much newer systemd option should be used instead.
In order to create a service, a new file needs to be created inside /etc/systemd/system folder, with a .service extension.
Ex: sudo nano /etc/systemd/system/magid.service
[Unit]
Description=Coin Magi Service
After=multi-user.target

[Service]
ExecStart=/usr/local/bin/magid
RemainAfterExit=yes
Restart=on-failure
RestartSec=60

[Install]
WantedBy=multi-user.target
While this part is pretty much self-explanatory, a careful attention should be given to the ExecStart part, where the full path to magid should be specified.
Also, if daemon=1 is not specified in the config file, a -daemon option should be added.
Next the service needs to be enabled:
$ sudo systemctl enable magid.service
And start the service:
$ service magid start
Confirming the status of the service, and that everything runs correctly:
$ service magid status
Making it easier!
Using the wallet on a regular-basis may pose some frustrations, as the commands are not so easy to remember, and their output, while well-formatted, is not very “convenient” for the user.
Taking advantage of the fact that all outputs are JSON formatted, I created a small web-based monitoring interface:
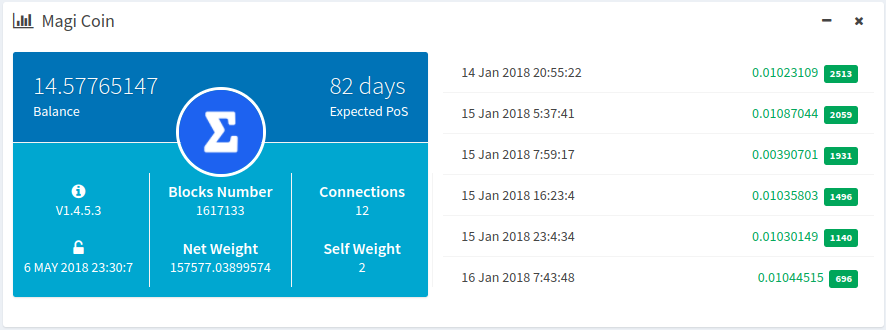
The information is extracted using the following commands:
- From
magid getinfo:"version","balance","connections","unlocked_until" - From
magid getmininginfo:"blocks","netstakeweight","stakeweight":"combined","Expected PoS (days)"or"Expected PoS (hours)"(the key changes!) - And from
magid listtransactions "" 6where""indicates the account label (empty) and6indicates the number of transactions to get:"category","amount","confirmations"(indicated by color, <520 = yellow, >520 green),"time".
Final words
I want to thank the great guys over at the Magi Coin Telegram Channel for bearing with all my questions as I brought up this comperhensive post.
This is also the first of a series of posts I plan to write about Magi Coin, and I’ll link here all the other posts down the road.