htop doesn’t need any introduction among Linux users. It has become so much popular that I doubt anyone uses the traditional top anymore nowadays.
I wasn’t looking for any replacement or anything, but I just happened to stumble upon this fork, and what caught my eyes was the CPU temp and frequency implementation.
While it does have a precompiled deb file for armhf device, and even detailed instructions on how to install it on a Raspberry Pi, I prefer to complie things myself.
1. Dependencies
$ sudo apt install build-essential automake git libtool libncursesw5-dev
- build-essential →
dpkg-devg++gcclibc-devandmake. automake→ Required for generating files usingautogen.sh.- git → For cloning the source code depository.
- libtool → Library importing helper. Part of the GNU project.
- libncursesw5-dev → An implementation of GNU ncurses. If it’s not installed, the following error message will pop up when running
./configure:error: You may want to use --disable-unicode or install libncursesw.
2. Clone the repository
$ git clone https://github.com/wbenny/htop.git
Note: It should be a good idea to cd first to a different folder other than ~/.
3. …and rest in one shot!
$ cd htop && ./autogen.sh && ./configure && make
cd htop→ Enter the source code folder../autogen.sh→ Getting the source code from GitHub requires generating some files with this command../configure→ Configuring the compiler for this specific device. Should autodetect all CPU architectures with no problem.make→ The actual compiling command. It’s possible to run it in parallel by adding-j CORES(I usually use-j 2).
4. OPTIONAL: Installing it
Running make install (may require sudo) after a successful make will install htop to /usr/local/bin.
It may be a good idea to first uninstall htop is it’s installed already. (defaults to install in /usr/bin)
$ sudo apt purge htop
Note: I used purge to clear old config files as well.
5. OPTIONAL: Making sure the old config file is gone
htop creates a configuration file at ~/.config/htop/htoprc which saves the user’s preferences. It may be a good idea to remove it, to avoid compatibility issues:
$ rm ~/.config/htop/htoprc
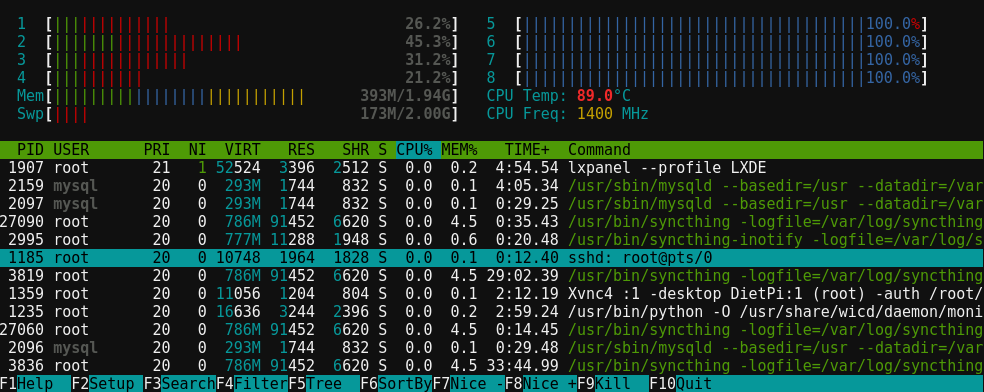
6. Finally! Add the desired meters!
htopF2→ To go to setup.- Choose desired meters from the rightmost column and add them to the left or right columns.
Esc→ To go back.F10→ To quit and save preferences.
Note: I usually closehtopviactrl+c, but then it skips saving preferences, so be careful there.